

How To Fix An Underexposed Raw Image In Affinity Photo
Wish you knew how to set up underexposed photos?
It happens to everyone at some point.
You take that perfect photograph, then move on to the side by side matter without checking to run into how it came out.
When you open it later, you realize it's way too dark or underexposed.
This might seem like the end of the story, only it doesn't take to exist. Considering at that place are ways to fix underexposed photos!
Read on to learn pro fixes with Adobe Lightroom or Photoshop, and super easy fixes with free tools you lot may already have on your figurer or phone!
Disclosure: Some links below may be chapter links, which means I may earn a commission if you lot choose to purchase.
Why are my pictures dark?
Earlier nosotros talk nearly how to fix underexposed photos, let'due south take a moment to think about why it happened in the first place.
Here are some of the virtually common reasons.
Backlit field of study
For casual snapshots, you lot often meet a state of affairs where the subject of your photo has their dorsum to the strongest light source.
Just it's a slap-up shot! Or a retentiveness you need to save. Then you lot snap information technology anyhow.
When you lot check later, your friend is almost a black silhouette, and no one but you even knows who it is.
No worries. Easy set up!
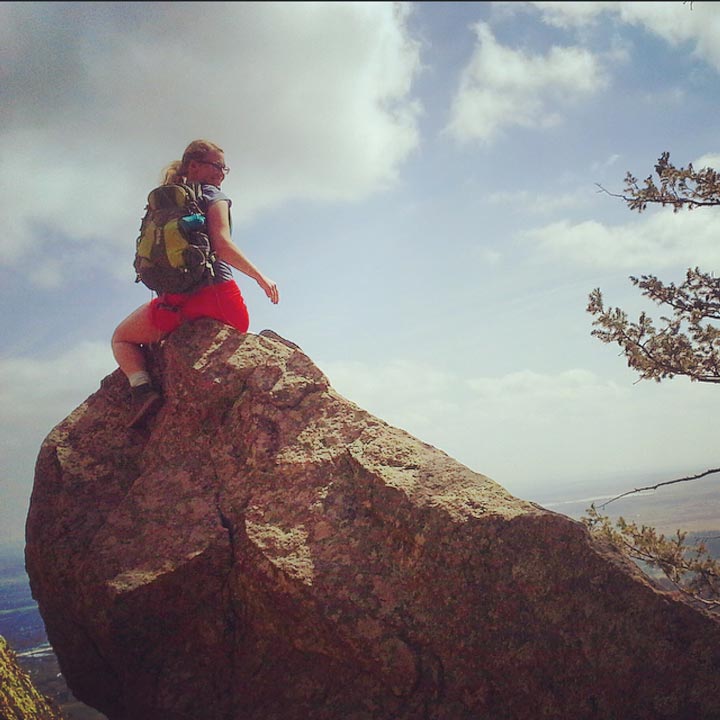
I corrected the one below right in the Instagram app. Like shooting fish in a barrel peasy!
The tutorial for this fix is towards the terminate of this article.
Harsh shadows
It'due south best to avoid taking photos in strong sunlight, equally y'all'll get parts of the image that are also brilliant, and others in heavy shadow.
Incorrect camera settings
Maybe you lot're in a bit of a hurry and forgot to change the exposure, or picked the wrong one.
If you lot used the flash, it might non take fired at the right moment, or it was on the wrong setting.
And and so there's metering mode. In this situation, if the image has very dark darks or very light bright areas, the camera's sensors can give an incorrect reading.
That's why learning how to set up underexposed photos is so of import!
How do y'all fix a picture that's too dark?
There are a few ways to ready a flick that'due south besides dark and underexposed. The exact route y'all accept depends on the software you're using, and how bad the trouble is.
Let's look at how to gear up the issue on the top photograph editors to give you some examples.
There are as well three questions to inquire before you start editing dark photos:
- Is the entire epitome dark?
- Is information technology just that sure parts of the photo are too dark?
- Or information technology is a combination of both?
These will help y'all selection which route y'all demand to take when editing the photo.
Our tutorial starts with the pro tool Adobe Lightroom directly below.
Prefer Photoshop? Jump to learn how to fix underexposed photos in Photoshop.
PicMonkey users tin acquire how to fix photos with PicMonkey.
If these tools are above your head (or budget!) you can skip right to the quick and easy photo fixes.
How to fix an underexposed photo in Adobe Lightroom
To beginning with, if you want to brighten a night photo in Adobe Lightroom, yous tin can apply the exposure slider.
Move it to the correct to lighten the whole photo.
If you simply desire to lighten parts of the photograph, then there are a few options to play with to achieve this.
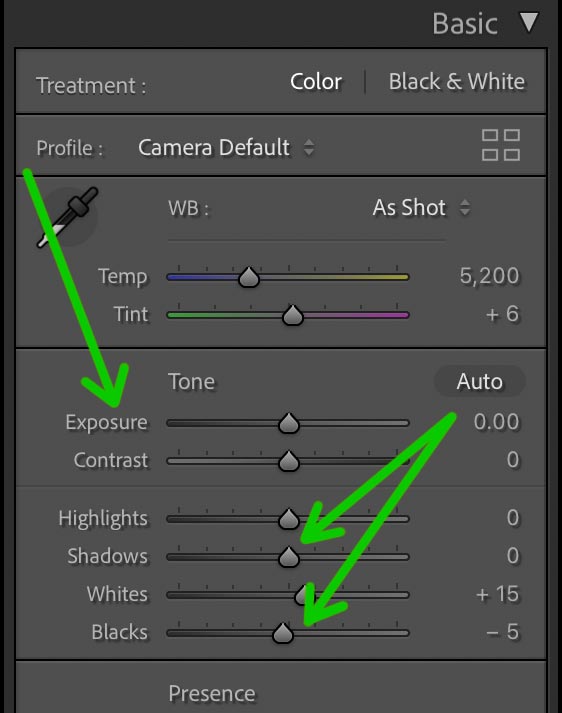
Bones pane sliders: shadows and blacks
The shadows and blacks sliders are the most effective for brightening parts of an underexposed image.
By moving either to the correct, the calorie-free and highlight areas aren't affected.
Tone bend
The tone curve is smashing if you take an idea about what range of tones you need to adjust.
Say the brightness is needed in the mid tones, then just click the middle, and drag up so the curve bows slightly.
This is a footling more than circuitous than the outset pick but is worth trying. You can always undo the activeness if it doesn't seem correct!

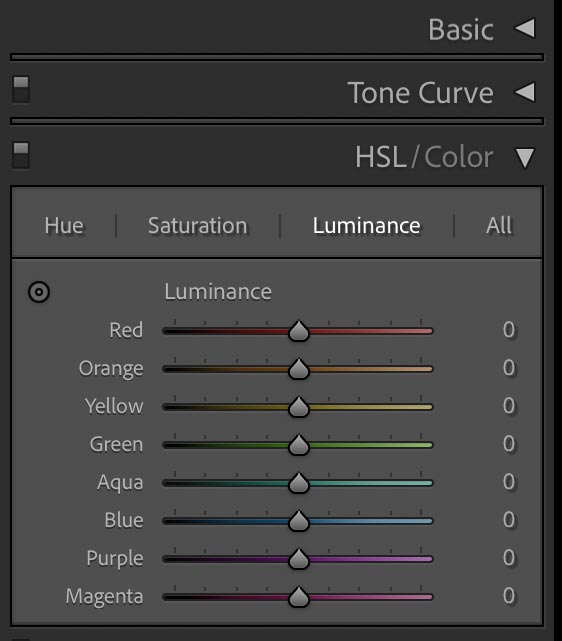
Luminance slider (in the Lightroom HSL panel)
The luminance settings assist to brighten particular colours in a photo.
Once again, you need to have an idea about what color you desire to adjust. But you lot can ever test different ones to come across what works.
Just watch the vivid areas as this impacts them also, and tin can make them look a niggling odd.
Tools that accommodate a selected local area
There are a couple of tools that can allow you to select and conform a local area. Examples include:
- Graduated filter: brighten a section from 1 of the sides.
- Radial filter: ideal to brighten faces.
- Adjustment brush: nifty for lightening (dodging) specific parts with a 'castor' on the screen.
Effort these out when you lot want a more specific surface area lightened.
Learn more in our gratis Adobe Lightroom for beginners tutorials.
How to fix an underexposed photograph in Adobe Photoshop
Equally with Lightroom, at that place are several means to fix underexposed photos in Photoshop.
You'll find these under the Epitome > Adjustment bill of fare as shown below, or by using an Adjustment Layer.
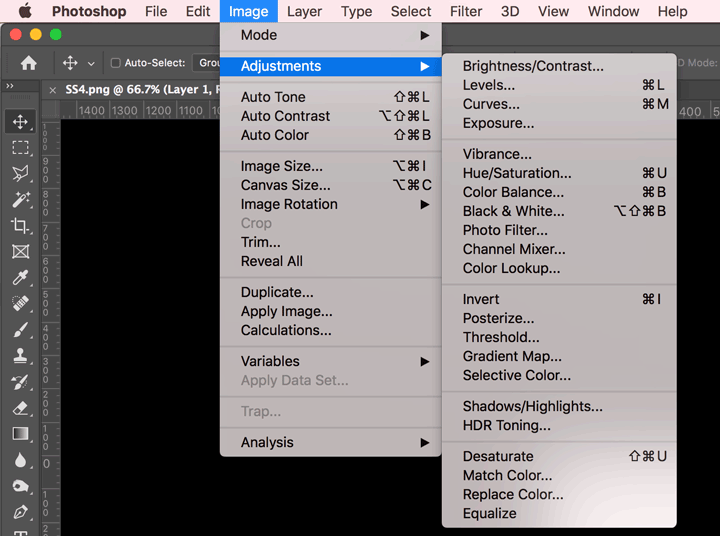
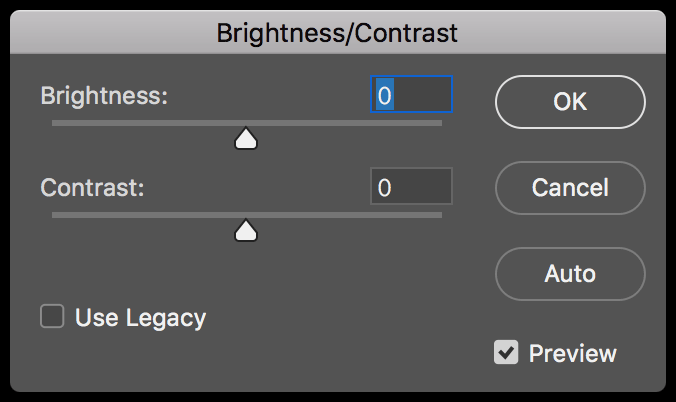
Effulgence/Dissimilarity
The offset option is to go to Image > Adjustment > Effulgence/Contrast or use an Aligning Layer.
This is a proficient elementary way to handle an image that is likewise dark overall.
Brightness adjusts the midtones while leaving the darkest and lightest areas alone.
You might need to adjust the contrast a little to compensate after using it.
Exposure
Next is the Exposure setting – which might seem like it is merely for exposure. merely isn't.
Yous can use it to increase or subtract the tonal values in an paradigm.
This ways light areas will get lighter and dark areas will also get lighter. Or darker if you employ information technology that way.
It works best for RAW files and to correct camera errors. Or just to make very modest adjustments.

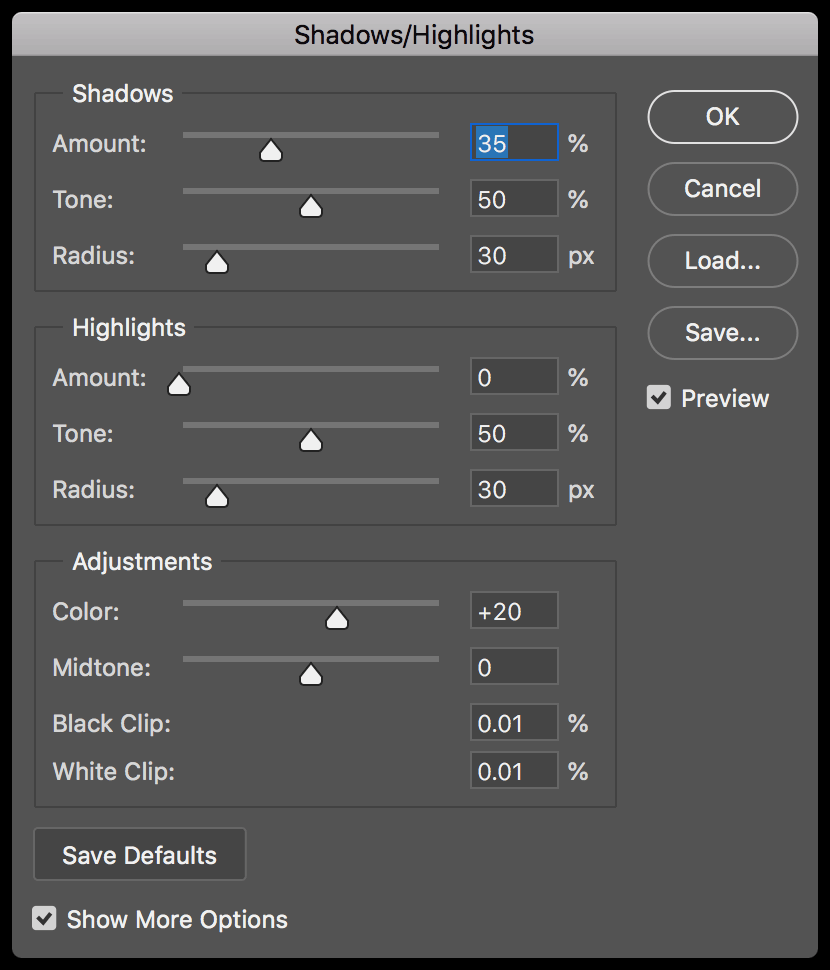
Shadows/Highlights
In Photoshop, become to Image > Adjustments > Shadow/Highlights or make an Adjustment Layer.
Now y'all can use the Shadows slider to brighten the darkest parts of the paradigm.
The Highlights slider will darken the lightest parts of the image. Try both to run into if they help ready the photo.
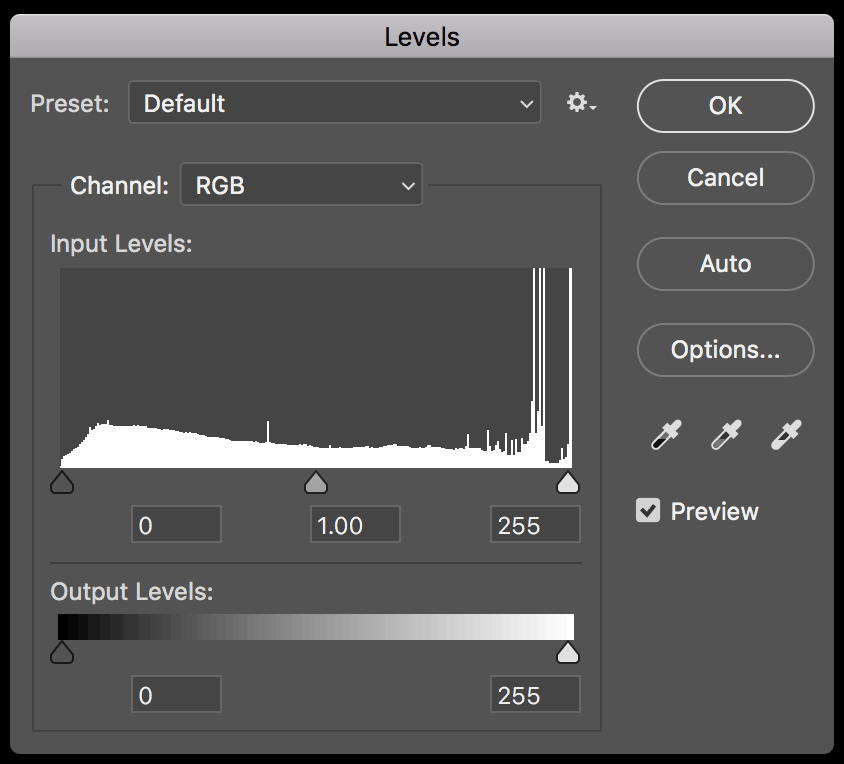
Levels
While the first 3 settings let you alter a photo based on what yous see, the next ones use the Histogram.
With Levels, you can command the tonal range and colors in the epitome.
It opens with CTRL+L (Cmd + L on Mac) or as an Adjustment Layer.
In that location'south the histogram with three sliders under it.
For brightening dark photos, the middle slider is best as this adjusts the midtones.
Y'all can too use the right-hand slider to adjust the brighter parts of the paradigm if they are showing every bit underexposed.
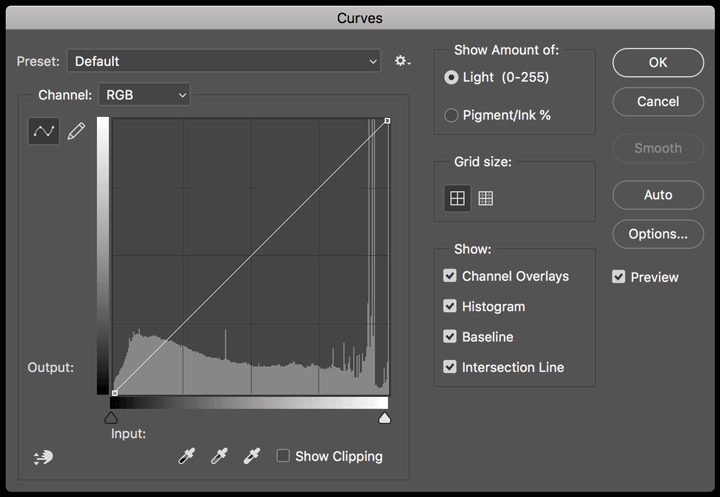
Curves
Finally, there's Curves, which works in a like style to Levels only has more precise control.
This is something near often used by professional photographers who need to make infinitesimal adjustments to their photos.
It opens with CTRL+K (Cmd+M) or an Aligning Layer.
Again, it uses the histogram and there's a diagonal line to manipulate to alter the photo.
Not sure if y'all desire to use Photoshop or Lightroom to edit your photos? Adobe offers them both for ane low price.
How to fix an underexposed photo in PicMonkey
PicMonkey is a great tool for graphic design, and also includes some top-notch photo editing options. This includes settings that work to adjust an underexposed photo.
Beginning, you can bargain with underexposed images with the Auto Adjust Exposure setting.
Get to the Edits tab on the left toolbar and select Exposure.
Click the Auto Adjust Exposure to lighten the photo.
You tin can then apply settings such as Brightness, Highlights, Shadows and Contrast to tweak the photo further.
In the video below, Beryl Ann Young shows you how to rescue an underexposed photo from the throwaway pile, by making exposure adjustments in PicMonkey.
Presto! Another photograph saved – in under a infinitesimal.
Get PicMonkey hither.
Quick fixes for underexposed photos
While the 3 in a higher place are the pro-level options when it comes to photo editing software, in that location are a few options for quick and easy fixes, too.
Mac Photos app
If y'all have an iPhone or a Mac estimator, you can utilize the Photos app to make some basic adjustments. Quite honestly, I use this a lot since I'yard already in the app perusing my photos!
There are options to accommodate the light, color, or blackness and white points within the app.
In that location'south also an easy one-click auto correct button! Exam it and see how your photo comes out. Sometimes that'south all you lot demand.
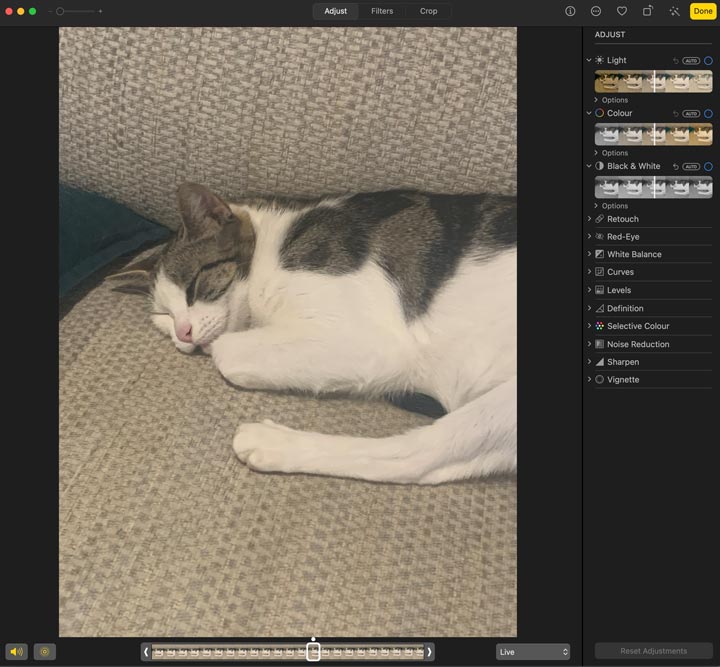
You tin also adjust the white balance, curves, or levels in similar ways to Photoshop for more advanced fixes.
Microsoft Picture Manager
Windows users take Movie Manager on their device. This lets you adjust the effulgence and dissimilarity of a photo.
It isn't ever available on newer devices, so you may need one of the other options here.
Canva
Canva is bully for about any graphic design chore, but photo editing isn't its stiff suit.
However, if y'all're already a Canva user, y'all tin enhance images with a couple of settings inside the app.
You can lighten images with the brightness slider.
Simply click the 'edit image' option above a photo within a pattern, and the edit settings volition appear.
You can also adjust the contrast and saturation if they look like they need it.
Plus, there are filters to endeavour if you just tin can't become the image to look equally you want information technology.
Try Canva hither.

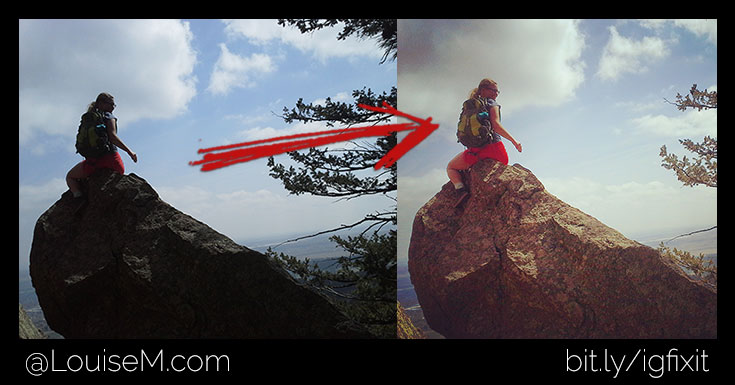
Can y'all set up underexposed photos inside Instagram?
If you start to add your photo to Instagram and find that information technology's underexposed, you tin can employ the editing features built into the app. They really help!
One time you've uploaded a photo, you can tap Next, then Edit, at the bottom of the screen.
At that place are features such every bit Adjust, Brightness, and Dissimilarity that can help lighten a dark photograph.
You lot tin likewise adjust the warmth of a photo to change the tone of the color.
Highlights and Shadows work on the bright and dark areas.
Finally, you can Sharpen photos to make them clearer.
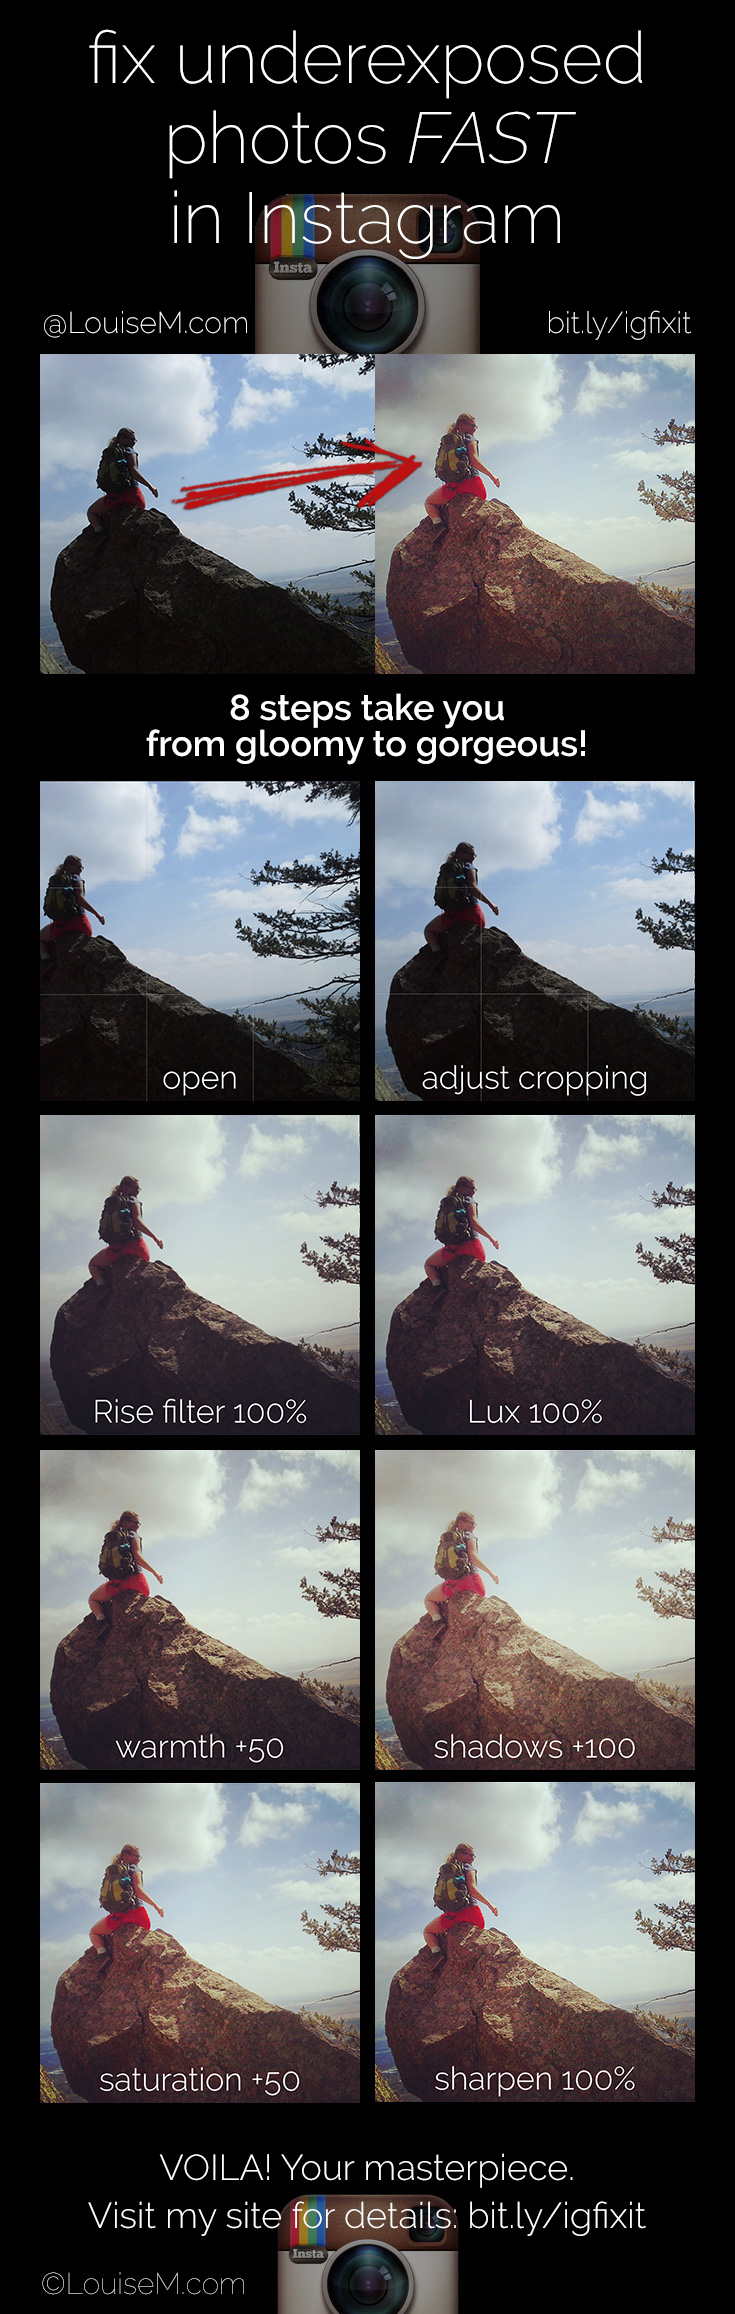
Here's a walk-through of how I made the dramatic change in that underexposed photo of my daughter. Follow along with the images. You may vary the settings you use on some of the steps – simply this gives you a good starting point.
Yous can ever become back and disengage or adjust anything, up until you postal service (or save) the image.
If you wish to salve your epitome at a college resolution than the Instagram image size of 1080 pixels wide, be sure you take Relieve Original Photos turned ON in your settings.
1 | Open up photograph in Instagram. Below, you lot'll encounter the original shot.
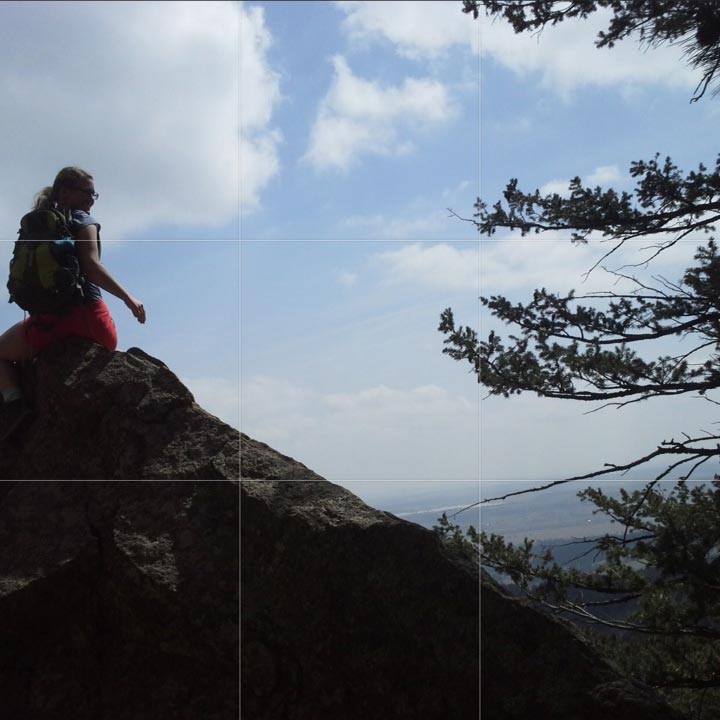
2 | Adapt cropping: A great spot for your subject is at i of the filigree cross points, taking advantage of the rule of thirds.
Just touch and slide your photo into the position y'all like.
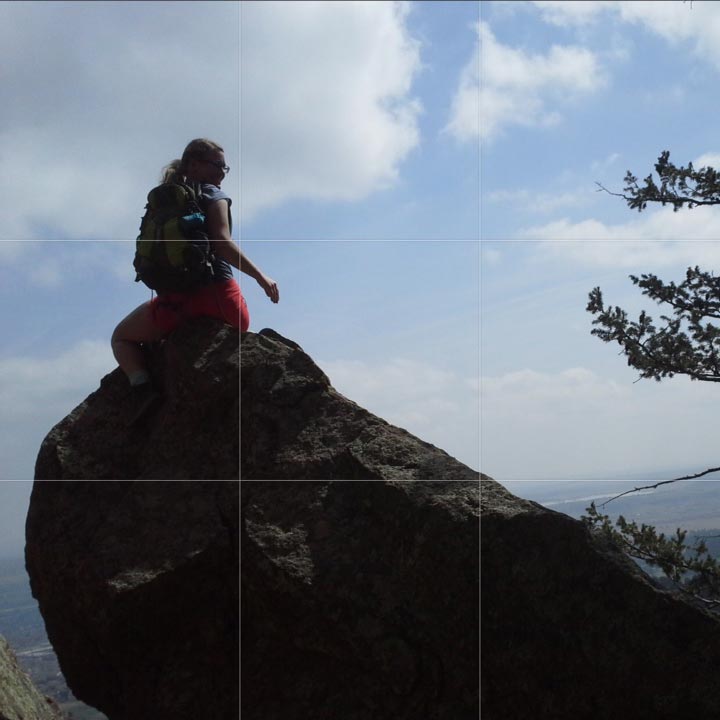
3 | Add Rise filter: I've found this to be the ultimate for raising your exposure.
four | Add Lux: For Well-nigh photos, it adds item in both shadows and highlights. If you recall information technology makes your photo look worse, skip it!
5 | Add Warmth: Shadows are normally very "cool." Endeavor adding Warmth +50.
6 | Open Shadows: How much depends on how heavily adumbral your photo is. I cranked it!
7 | Add Saturation: Your colors are now faded, so add together some popular with Saturation. Fifty-fifty +ten will help!

viii | Acuminate: I always Sharpen my photos, unless it'due south a facial portrait, where sharpening may emphasize unwanted lines and blemishes.
Here I used 100%! See what looks all-time to y'all.
Yous can also check out how to use Instagram's structure tool to add detail.
You tin can pin the infographic at the end of this article to Pinterest equally a reminder of these steps.
Don't ditch those dark photos
As you lot can run across, there are a lot of ways to edit your photos, even when they come up out underexposed.
And so don't requite upwardly on those too-dark pictures. Instead, spend a footling time fixing them.
But watch your camera and settings likewise. Avert those common errors then you don't demand to edit as much.
For the moments that you tin't, at present y'all know how to fix underexposed photos!

How To Fix An Underexposed Raw Image In Affinity Photo,
Source: https://louisem.com/12519/how-to-fix-underexposed-photos
Posted by: walkupthoon1994.blogspot.com
0 Response to "How To Fix An Underexposed Raw Image In Affinity Photo"
Post a Comment